This handbook page provides an outline of the training resources, examples, tools, and tips for Technical Account Managers (TAMs) to use when sending documentation to partners.
Table of Contents
- Commonly Used Tools & Media
- Custom Training Resources
- Commonly Used Links to Public Documentation
- Accessibility
Commonly Used Tools & Media
Creating the Documentation
This section describes tools and platforms that Technical Account Managers (TAMs) can use to create and share documentation with partners, such as Google Docs, Screenshots, screen recording tools (such as loom), or recorded sync-calls.
Screen Recording: Using Loom
For screen recording, Loom is a great tool you can install either as a Chrome Extension or as a stand-alone app. It allows you to record your screen, your microphone (if needed), and yourself on camera (you can turn this off if you like) with a few clicks. Once recorded, the video is automatically uploaded, and you get a link to share with partners and embed in other places.
Loom also allows you to trim videos after they’ve been uploaded or stitch multiple ones together (see how to edit videos on Loom). You can also add chapters for any longer video so that partners can directly jump to the section they need.
Team51 Loom Account
Here are some tips when using Loom for our partner’s documentation:
- Make sure you’re logged in with our team account (credentials in 1Pass), so the whole team has access to the videos. Using our team account also ensures that the videos are easier to find for anyone on the team. It also avoids the scenario where someone’s individual account on a video service expires and the associated videos are no longer accessible.
- When creating multiple videos for the same partner, consider creating a folder for that partner, so all the videos are organized together and are easy to find. (See: organizing your library folders)
███████████████
Security & Access on Loom
- Remember that videos on Loom are automatically public and visible for anyone with the link, so avoid showing sensitive information in them.
- If you accidentally included sensitive information, you can edit it out by:
- Using the trimming functionality (available on the “Business” plan)
- Adding an overlay box (available only on the “Business + AI” plan)
- If you have included sensitive information and still need to share the video as-is with the partner, you can consider this workaround if needed:
- Change the permissions on the Loom video so that only our team account can access it (Automattic Special Projects – see how to in the docs)
- Download the video from Loom and upload it to the Shared Google Folder, where only the partner has access.
- Share the link to the video file on Google Drive, and if you like, delete the video from Loom.
Screen Recording: Using QuickTime
Another option for screencasts is QuickTime Player, which comes bundled with macOS, and it’s another tool to consider if you prefer.
Begin a screencast by selecting File > New Screen Recording. As with Loom, you can opt to record the entire screen, a specific window, or a selected area of the screen.
Under “Options,” you can choose the appropriate microphone, set a countdown timer, or select an option to show mouse clicks, which can help viewers better follow the actions being demonstrated.

QuickTime also allows you to quickly trim a video or strip out audio or video, among other basic features.
Convert the Video File to a More Compatible Format (like .mp4)
Keep in mind that the resulting file format is .mov, which may not be easily viewable by default on all devices, particularly Windows. Converting to a more compatible format like .mp4 is recommended before sending to the partner. Handbrake is one open-source app that can be used for this.
If the resulting file is too large to send as an attachment, other options include uploading it to the team’s Google Drive (make sure the file or folder is shared with the partner) or embedding it on a private page on the partner’s site via VideoPress.
Presenting the Documentation
This section describes options that TAMs have to share training materials and documentation with partners, such as a workshop during a sync call (ideally to be recorded), a private page on the site with a collection of videos or links, the Admin Help Docs Plugin, etc.
How we share training resources with partners will likely depend on their communication preferences. Some partners find calls helpful, but arranging this can be difficult in instances where partners have busy schedules.
Options for sharing training resources include:
- A private page on their site
- Sync calls (ideally, to be recorded)
- Emailed documentation
- Dashboard plugin
Private Page
We can add a private page on the partner’s site to compile all training and onboarding resources we’ve gathered or completed for them, including any material that’s specific to them. This can be especially useful when you have a library of videos to share.
Example Private Pages for Partners:
(Please note these are set to private, so you’ll need to be logged in to the WP-Dashboard to see them)
- ███████████████
- ███████████████
- ███████████████
Sync Calls
If you have a training call with a partner, consider including those walk-throughs where you’re sharing the training resources with the partner as well (Private Page, Help Docs, etc.), as those can be helpful for partners who may wish to refer back to it in the future, or share it with other members of their team (Remember to convert and optimize the video if needed – see section above).
Planning a Training Call
Training calls can vary greatly depending on the level of knowledge and confidence the partner has with WordPress. When planning a synced training call, make sure to clarify:
- Are there specific areas the partner would like to focus on? Start with those.
- How much experience does the partner have with WordPress?
- If not much: consider sending them standard documentation links ahead of the call, so they can start reviewing those if they have time
- If they are experienced, it can be useful to ask them in advance what specific questions or areas they’d like to cover, so that you can review those ahead of the call and ensure you include them
Recording the Call
It can be useful for the partner to keep a recording of the call so they can refer back to it later, or share it with others in the team.
- At the beginning of the call, ask for the partner’s permission to record it.
- Offer to share the recording with them.
- Make sure to send the link to the recording in a follow-up email and check that the file’s sharing options on Google Drive are set so the partner has viewer access.
- Link to the recording on the project P2 and ideally also on the site P2 for our team’s future reference.
Emailed Documentation
Some partners prefer to learn via written documentation and may not be overly familiar with the WordPress Dashboard, so a private page might not be a very useful option. In these cases, drafting a clear, well-laid-out email with links to sources may be helpful, as they can easily relay that to other members of their team.
Example of Some Well-Laid-Out Emails With Partner-Specific Onboarding Info:
- WooCommerce Memberships & Subscriptions – ███████████████
- WooCommerce Marking products as out of stock – ███████████████
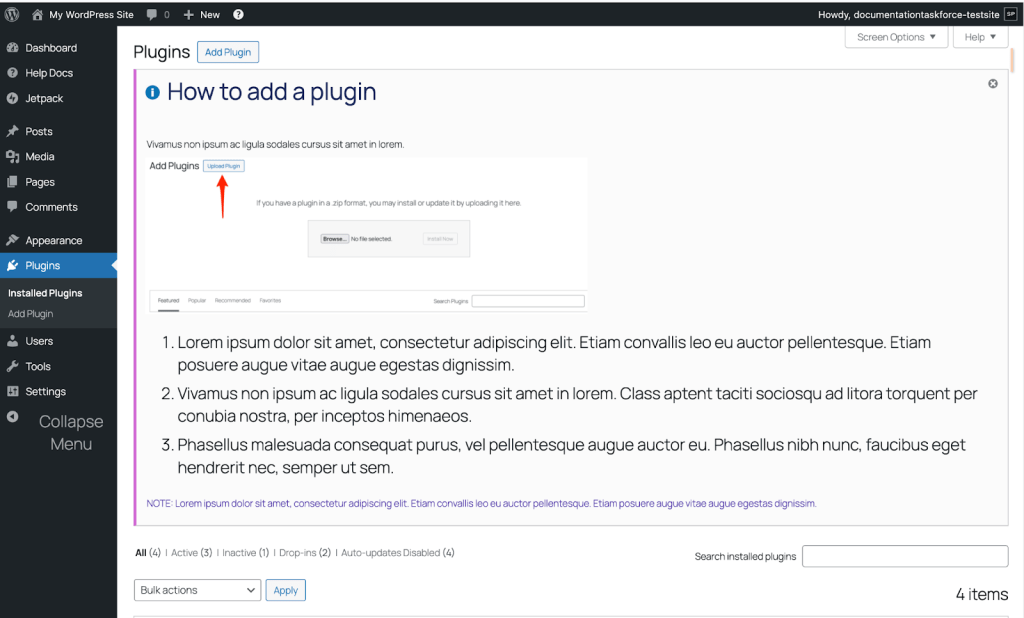
Dashboard Plugin
An alternative method of presenting documentation is using a plugin to display it directly within the site’s dashboard. The Admin Help Docs plugin [GitHub | WP.org] is specifically designed to facilitate this. During initial testing, the plugin showed potential.
Admin Help Docs allows you to create distinct pieces of documentation and assign them to areas within WP Admin. For example, you could make one guide available from Settings > Reading, and another from Tools > Import. This keeps relevant documentation in the specific area to which it applies, reducing the need for long documents that try to cover everything. Documents on individual pages display as dismissable notices, allowing users to hide them when not needed.
The plugin offers many useful features, including options to:
- Make docs available from the admin bar.
- Create a table of contents that provides quick links to all available docs.
- Switch from the default classic editor to the block editor.
- Customize accent and text colors.
- Add a custom logo.
- Include created/last modified dates.
- Copy settings from another site.
- Allow admin-doc editing by users in roles other than Administrator, such as Editor, Author, or Contributor.
Another interesting feature is the option to make a document public using a REST-API endpoint. This allows docs to be shared among more than one site, with documentation maintained in a central location. This could help keep documentation relevant to multiple sites in sync more efficiently.
One small downside is that you can’t seem to apply a doc to more than one area in WP Admin. So if a guide might apply to two or more dashboard areas, you’d need to either choose one, or put it in a more general spot.
This option is still under discussion, but it might be a valuable resource as we continue to experiment with its use.
Custom Training Resources
When we need to create training resources for a custom feature that is very specific to the partner, always try to keep them short and focused only on the custom part, and refer to the general public documentation for the areas that are not custom-made.
AI for Custom Training Resources
How TAMs Can Leverage AI
Leverage AI to Create Documentation from a Recorded Session
If you’ve already completed a training call with a partner, one efficient approach to creating a customized training doc is to use AI to generate a draft (███████████████).
After your training session—especially if you’ve covered basic WordPress functionality and any custom features—you can paste the call transcript into ChatGPT or Claude.ai (make sure we’ve asked for the partner’s permission to record or generate a transcript of the call; see the section “recording a training call” above). You can also include relevant content from our standard documentation, such as the “Introduction to the WordPress Editor” section.
From there, ask the AI to create a training doc using that input. The result will likely include both general WordPress guidance and site-specific information.
This method can save time and help ensure that your documentation reflects exactly what was discussed during the call.
Important note: When using AI to summarize information from a partner call, please ensure that no confidential information is included in the prompts (neither from the partner nor from A8C), similarly, make sure you’re using one of the LLM models that are approved by A8C for wider use (███████████████).
How Partners Can Leverage AI
Part of our mission is to empower site owners to utilize their sites and create content. This section outlines commonly used AI tools and talking points that TAMs can use when advising partners on how to leverage AI for content creation on their websites, including text, images, and more.
These tools can support partners in drafting copy, sourcing or generating images, and speeding up content production, particularly helpful for teams with limited time or resources.
AI Content Tools – Applications
Partners can use AI content tools to:
- Draft blog posts or landing page content
- Summarize long-form content
- Reword for clarity or tone
- Generate ideas or outlines
- Translate content into other languages
- Create forms
- Generate images
- Improve image quality
AI Content – Suggested Tools:
- Jetpack AI Assistant — Available right in the site editor and can be used to assist with writing text, generating images (perfect for featured images), forms, and tables
- ChatGPT, Claude, Perplexity — These are useful for brainstorming and longer-form content generation. Encourage partners to copy/paste drafts into their sites manually and edit for tone/accuracy.
- Canva’s AI Image Generator – Create visuals from simple text prompts
- Openverse – Free, openly licensed images searchable inside the editor
Tips to Share with Partners:
- Always review and edit AI-generated content; it can be helpful, but it is not always accurate.
- Encourage partners to maintain their own voice and style.
- AI-generated content should be treated like a draft, not the final copy.
- Not all AI-generated images are free to use commercially — partners should check usage rights.
- Remind partners to add alt text for accessibility and SEO.
- Many of the AI Tools are not free (though they have limited free plans) and carry additional costs for longer-term/expanded use.
Limitations & Considerations
AI can be a helpful assistant, but it’s not perfect. When advising partners:
- Encourage review of AI-generated content for tone, accuracy, and potential bias. AI tools can hallucinate, so it’s very important to verify the accuracy of any AI-generated text content
- Avoid using AI to write about sensitive or proprietary information.
- AI-generated content may not always be unique — partners should avoid over-relying on it for SEO purposes.
Summary Talking Points for Partners
You can share these key points directly or adapt them to the project:
- “AI tools can be a great way to save time, especially for small teams. Just be sure to review everything before publishing — think of it as a co-writer, not a replacement.”
- “If you’re using WordPress.com or Jetpack, you can use Jetpack AI right in the editor to draft content, reword things, or ask questions about your topic.”
- “Free image tools like Openverse and Canva’s AI features are great for adding visuals to your content — just make sure to check licenses before using generated images commercially.”
Please refer to our AI Tools Handbook Page for additional information and resources.
Commonly Used Links to Public Documentation
This section includes a non-exhaustive list of links for public documentation that we regularly use.
General WP Onboarding
- Intro to the Editor (WPCOM)
- Editor Overview (WPCOM)
- Select and Move Blocks (WPCOM)
- Restoring Revisions (WPCOM)
- Managing Plugins (WPCOM)
Analytics & Performance
Ads, Marketing & Promotion
Special Functionality
- Setting Up a Multilingual Site (WPCOM)
- Custom CSS in the Site Editor (Learn.WordPress.org Webinar)
- Setting a Static Homepage (learn.wordpress.org)
- Understanding User Roles (wordpress.org)
Other Resources (non-docs)
- Editing Content: Lists Example (███████████████)
- 12 Video Guides for Block Themes (███████████████)
- Adding a Video to a Post (███████████████)
- Using Blocks to Add Event Time (███████████████)
Woo
- Woo Order Statuses (woocommerce.com)
- Managing Products in Woo (woocommerce.com)
- Setting Up Shipping Zones (woocommerce.com)
Woo Memberships & Subscriptions
- Woo User Memberships Status (woocommerce.com)
- Woo Subscriptions Status Guide (woocommerce.com)
Other Resources (non-docs)
- Duplicating Products and Adjusting Settings (███████████████)
- Finding Orders and Subscriptions in Woo (███████████████)
- Using Coupons to Comp Customers (███████████████)
- Setting Up Sales (███████████████)
Newsletters
DotCom
- Paid Newsletters (WPCOM)
MailPoet
- Setting Up a MailPoet Drip Campaign (███████████████)
- MailPoet Tutorial (███████████████)
- Saving a Draft Email in MailPoet (███████████████)
- Editing Links in MailPoet Templates (███████████████r)
Domains & Hosting
- Transfer a Domain to WPCOM (WPCOM)
- Custom DNS Settings (WPCOM)
- WordPress.com vs. WordPress.org (WPCOM)
Content & Content Structure
- How to Create Posts (WPCOM)
- How to Create Pages (WPCOM)
- Pages vs. Posts (WPCOM)
- Categories (WPCOM)
- Categories vs Tags (WPCOM)
- Organize posts with tags (WPCOM)
- Add and Edit Categories (WPCOM)
Images & Media
- Image block (WPCOM)
- Working with Images (WPCOM)
- Using the Media Library (wordpress.org)
- Featured Images in Posts (developer.wordpress.org)
Custom Features (Partner Specific – Examples)
- Editing Custom Hero Block With Seasonal Schedule (███████████████)
- 16 Video Instructions for Custom Blocks & CPTs (███████████████)
- Inserting an Ad Pattern Into a Page Template (███████████████)
- Editing Restricted Content on a Member-Only site (███████████████)
Accessibility
If you need to share accessibility resources or tips with the partner, please refer to our “Accessibility Best Practices – At a Glance” ███████████████ for more details.
Public Links About Accessibility to Share With Partners
- Improve your site’s accessibility
- How to Add Alt Text to WordPress Images: Guides and Benefits
- WAVE Web Accessibility Evaluation Tool
- HappyScribe (can generate transcripts from video)
This section provides a quick reference for TAMs to help partners create and maintain accessible websites. It includes a few content-specific best practices and broader accessibility (A11y) considerations that partners should keep in mind while editing or managing their sites.
Accessible Content Best Practices
When partners are writing or editing content, here are key tips to share:
- Use descriptive headings. Write headings that clearly describe the content that follows, like “What’s Included in Your Subscription” or “Pricing for Small Businesses” instead of vague labels like “Overview” or “More Information.”
- Follow proper heading hierarchy. Structure content with proper heading hierarchy (H1, H2, etc.). This helps screen readers and improves readability for everyone.
- Write meaningful link text. Avoid “click here” — instead, use descriptive phrases like “View our pricing plans” so users understand where the link goes.
- Add alt text to images. Alt text helps describe images to users who can’t see them. Keep it concise and relevant.
→ If the image is decorative, mark it as such or leave alt text empty (“”) so screen readers skip it. - Use plain language where possible. Avoid jargon. Short sentences and clear language improve understanding for all users.
- Ensure good contrast. Although the theme our team creates will generally take care of this, it’s important to keep in mind when using custom colors on specific blocks. Text should have enough contrast against its background – for example, dark gray text on a white background is generally safe. The block editor has a feature to warn users when a selected background/foreground combination may not be accessible.
- Consider adding text transcripts and/or close captions to video and audio content. Text-based transcripts and close captions ensure that your video and audio (such as podcasts) remain accessible to the widest audiences.
Site Editing & Visual Considerations
Even when partners are only editing their sites (not building them from scratch), there are several A11y practices they can follow:
- Don’t rely on color alone. Avoid using only color to convey meaning (e.g., “items in red are required”). This is something we’ve likely covered during the design phase with our team’s focus on accessibility, but it’s good to reiterate to partners as a practice to maintain when adding future content.
- Test with keyboard navigation. Make sure key actions (menus, forms, popups) can be accessed using only a keyboard (Tab, Enter, etc.). Again, this is something we likely have covered during our QA, but for partners who are more hands-on and wish to make larger changes to their site, keeping this in mind is a good way to ensure a basic level of accessibility.
- Leverage the heading and other structured blocks in the editor. In WordPress, using proper block types (like headings, lists, etc.) improves accessibility compared to manually styling text (e.g. with bold or increased text sizes to indicate hierarchy).
- Check forms for labels and instructions. Every form field should have a label. If instructions are needed, they should be visible and not just placeholder text.
